Tuesday 16 June 2009

Scene 1

With time steadily running out I got to work on scene 1's environment designing, lighting and animation.


Above I created a sort of crummy, dark and eerie laboratory/factory environment. To keep with the atmosphere I kept the use of dark shaded colours: black, blue and greys, with the use of grey blinns (with simple metal texture and soft bump map) for metal surfaces such as the control panel on the bottom left corner of the picture above and the robot containment lockers on the right (looking closely through the window I placed another robot inside).

The control panel possesses some glowing buttons so as to illuminate the scenary a bit and give it a sense of a technological place.

To keep in line with the style of the robot's design I tried to retain a level of simplicity and soft cartoony feel to the scene. I used some textures and bump maps but kept them all subtle and not too realistic to make sure it retains it's feel.

Below are some examples from he game Team Fortress 2 of the environment and the style of which I am aiming to create.


Saturday 13 June 2009

Final Stages

Now that Rave on Air and my Contextual studies are complete I can return to finishing off my animation piece. So far I have put the two characters into a scene and have begun animating the first shot of my final piece: The robot looking around for the alien, who pops out of the pipe, the robot notices the alien and runs up to the pipe.

Wednesday 27 May 2009

Animation tests

After blend shaping, setting driven keys, rigging and weighting the alien I performed a few animation tests to see how well these work.

Eye Test


Hand Test


Mouth Test

Robot with rust

To give the model more authenticity I decided to add some rusted sections and some areas where the paint has been chipped. This look gave it a more menacing and worn appearance, suggesting that it has done it's job many times before and is lethal.


To create the rust I used photoshop and a downloaded rust texture. In photoshop I played around with inverting the colours to change around the scheme then used the level tool to change the brightness of the paint and the chipped areas.

Wednesday 20 May 2009

Weight Painting

Week 4...

Finally now that the modelling is pretty much over I am able to start the weight painting, a long and difficult journey that will be filled with much buggering up of my work and restarting the entire weighting process ALL OVER AGAIN!!!

Even so no rest for the wicked (or busy)...

Friday 15 May 2009

Alien Face

I have managed to model up the basic alien face complete with techno helmet as I believe a stereotypical bald hairless alien is boring and an alien with hair is just too weird.

I also put on some attributes and rigs that allow the eyes to blink and due to it having no eyebrows I decided to have the eyes spin and twist around in the same fashion of eyebrows to add more emotion to the character.


Monday 11 May 2009

Alien character

Over the weekend I begun modelling my alien character. The style is to maintain a typical human-like figure but with a more cartoon styled build.


Wednesday 6 May 2009

Robot Colour Schemes

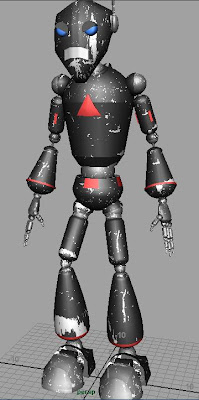
Now that I have completed the modelling of the Robot I went and tried out some different colour schemes. Due to the Musion technology being dark and with no background the use of black as a main colour was an uncertainty. I played around with colours such as red, blue and gold mostly.


I also begun adding some glowing features to the robot so as of giving it a way of brightening up itself body should I decide on a darker colour.


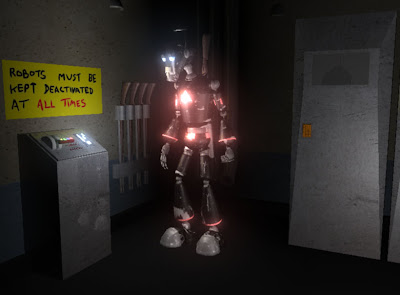
In the end I have stuck with a dark grey colour used the glowing pieces on the body so as to bring out the character more and make it more visible in the dark. The glowing pieces were decided to be red with yellow glowing eyes.

I might very well change the colour scheme before I begin animating but for now I have decided to keep the black body, yellow eyes and red glowing pieces version (bottom picture)

Tuesday 5 May 2009

Robot Character Current State

After the test I begun making the robot as a whole character. Below are the images of it's current state. So far the basic shape and build of the character is complete, all that remains is to add other features and design aspects such as buttons and equipment. After that the modelling state for the robot will be completed.

Robot Animation Test

After making a prototype robot character (minus the legs and most facial features) I applied a rig whereby I simply parented each individual bone to the individual body part that corresponded with it.

Below is a demonstration of the quality of the rig and model animated in a simple sequence of him looking at his 'Wrist Computer' then reaching behind as if to produce a gun from a back pack only to reveal his hand in the shape of a gun.


Wednesday 29 April 2009

Concept Art & Robot Animation


For a possible robot character I researched int robotic characters, toys and actual build robots. If can pull it off I intend to make a robot character for my animation using a method of rigging that requires the parenting of individual shapes (i.e. arms, legs, fingers etc) to the individual parts of a skeleton rig. This way I do not need blend shapes or any weight painting should the tests succeed and I can pull this off.